
Oh that we would desire His word like the Kimyal Tribe does
WordPress 3.1 Custom Fields
I’m working on a new client website and installed the new WordPress 3.1. I soon realized that custom fields were missing from the back end. I wondered whether a problem occurred during the installation or if one of the plug-ins I was using caused a problem.
I also realized that there were a number of other changes to the user interface as well and then remembered the screen options link.
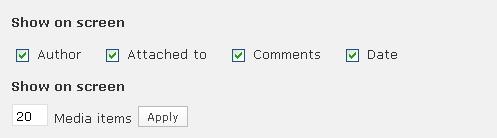
This latest release of WordPress 3.1 now has the screen options defaulting so that a number of options are toggled off. Options to toggle the visibility for excerpts, custom fields, discussion & comment options, even the slug. So if you were using some of these features and now don’t see them remember to check your screen options, just look for the drop down link in the upper right corner.
Here are screenshots for a few of the back end pages.

The Lord Is My Shepherd
The LORD is my shepherd, I shall not be in want. He makes me lie down in green pastures, he leads me beside quiet waters, he restores my soul. He guides me in paths of righteousness for his names sake.
Psalm 23:1-3 (NIV)
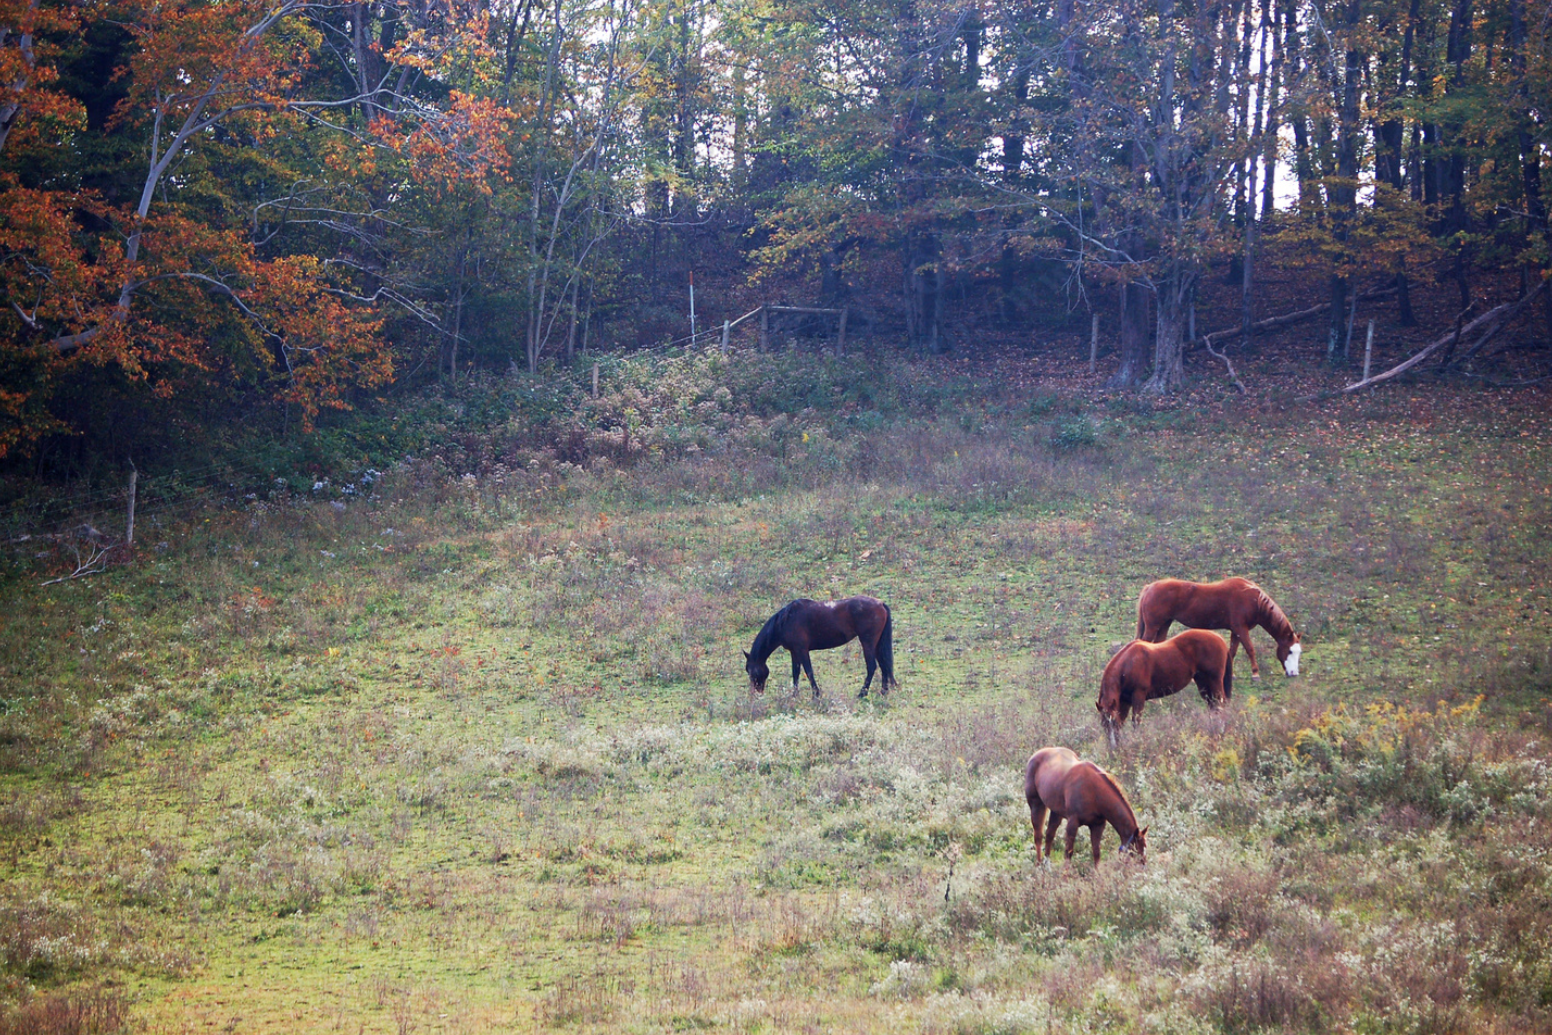
We were on one of our weekend drives through Licking County back in 2007 when we came upon these horses in the pasture, it just seemed right to stop and take a photo.
How To Create EPUB
Last month I posted about why I decided to publish an e-book for the Kindle format before any other version. This post briefly runs through the tools I used and some helpful links I found along the way in converting Fearful to Fearless to the EPUB format.
First, what exactly is epub anyway? The short answer is that it is epub is an ebook standard defining the xml and other media and metadata that makes up an ebook. Its documented by the International Digital Publishing Forum (IDPF).

SIGIL E-Book Editor
I use Microsoft Office Professional 2003 so I needed to begin by converting it to a compatible format as a starting point. I began with the same file & format I used to create the format for Kindle, filtered html. It’s basically an html file with the Microsofty tags removed and eliminates any hard page breaks. Here are the steps to create a filtered html from Microsoft Word.
- From the File menu, click Save as.
- In the Save as type box, click Web Page, Filtered.
- Click Save.
Next I selected all text in the document and set the style to Normal, this retained any bold, italics and indents in my document.
The next step may seem strange seeing as how the document was just converted from Word, but I opened the filtered html file in Word and saved it to a docx format. I have the Microsoft 2007 compatibility fixes installed to my Office 2003 version which allows you to read and write using the new 2007 format. I had attempted to convert the filtered html file directly to epub but there were still a number of resulting errors reported, converting from docx using epubgen worked great to get thing started.
The EPUB Code ProjectÂ
Next, you will need to visit the epub open source project at google and download a couple of programs that allow you to convert your docx or rtf document. It may seem a big complicated for a novice since these are Java programs and much of the discussion in the forum is technical in nature, but don’t worry you don’t need to know java to use the program, you will need to make sure you have the appropriate version of the Java Run Time Engine (RTE) installed however, you can check your computer here.
Click to visit the epub-tools project page and look for the download tab/link. On the download page look for the latest epubgenx.x.x.jar file and download it.
 When you are ready to run your document through the epub conversion simply double click the jar file which will open up the epub converter window. It’s not your typical windows application as there are no buttons, all you do is drag your document to convert into the “Documents” tab. Once the conversion is complete you drag and drop the new epub document to whereever you want.
Next you’ll need to download the epubcheck files, click the link to download the most current stable build and then click the zip file to download and save the most current binary version to your pc. You might see multiple versions… just grab the most current version, the one with the hightest version number. You’ll need to be familiar with working from the command prompt. Before running epubcheck you’ll want to run your document through the next step. An alternative would be to use the online validator from Threepress Consulting.
Sigil
The final download is for a WYSIWYG ebook editor named Sigil [screenshot]. I downloaded several programs that touted ebook converting, editing and converting but this was the only one that passed the epubcheck program which is a requirement if you want to publish in ebook format. Its still in the early stages of development but it allows you to edit, add chapters, update your table of contents and add a cover graphic among other things, plus comes with an online manual and a built in epub checker. Look to download the latest Windows setup.exe file from the Sigil project page. There is also a link to a basic tutorial which is very helpful. When I used Sigil I first attempted to use the filtered html file as the source but it produced many errors and warnings, thats why I took the time to first convert using the epubgen program and then perform the final edits and checks using the converted epub file. Be sure to run the built in epub checker that Sigil comes with, once it passes that I suggest running it by the official epubcheck utility.
EpubCheck

epubcheck run from command prompt
Adobe was a major initial contributor to the epubcheck utility, the epubcheck project page contains links to step by step instructions on how to setup and use epubcheck on your computer. Some of the comment threads mention online utilities that have been created however I wanted to know that I was using the latest version of the checker that was available. As mentioned earlier you will need to be familiar with working from the command prompt to be able to run this utility.
Testing
Once you have your validated epub document from epubcheck you’ll want to test it to see how it looks in an ereader. I tested using both Adobe Digital Editions and Barnes & Nobles Nook for PC. With your epub book opened in Adobe Digital Editions you can also check to see if there are any errors by clicking on arrow and click on “Item Info”.
Helpful Links
Here are some other helpful links I came across along the way in creating my first epub book.
- Looks like a good reference regarding epub cover images: blog.threepress.org
- Getting EPub wrong every possible way: This entry catalogs many of the same free programs I attempted to use prior to coming across Sigil. The author comments on Sigil as crashing but this was not my experience at all. Perhaps they used an earlier version.
- From Adobe an article on image optimization for the epub format.
- Finally you may want to look at Elizabeth Castro’s book titled EPUB Straight To The Point
How And Why Readers Buy And Read E-Books
From the Book Industry Study Group
From the Book Industry Study Group, Inc. (BISG) comes research collected directly from book readers that addresses how print-book buyers access, purchase, and use e-books and e-readers.
The survey found that 30% of print-book buyers would wait up to 3 months to purchase the e-book edition of a book by their favorite author. The study also found the top characteristics of why consumers purchase an e-book rather than a print book to be:
- Affordability
- Easy to download
- Readability
- Instant access to book
- Portability
- Searchability
- Environmentally friendly.
Source: The Foster Letter – Religious Market update 1/25/2010
From Publishers Weekly
And here is a link to an article titled “It’s a Digital Book World” from Publisher’s Weekly that summarizes the impact e-books have on the publishing trade.
Espresso Book Machine Not About Espresso
The Espresso Book Machine (EBM) has nothing to do with Espresso or coffee, but everything to do with books. Print On Demand (POD) publishing has been around for a number of years, it’s allowed companies such as Lightning Source & Amazon’s CreateSpace to capitalize on the growing market of self & small business publishing houses by providing a gateway into the publishing business. I talked about my experiences with both companies a few months ago in this post. It’s also a way for publishers to keep out-of-print titles in print by bypassing the warehousing of titles.
According to Publishers Weekly (1/3/2011) there are only about 50 set up around the world due to its high cost. But places that have it have a leg up on their competition because the entire catalogue of titles available from industry leader Lightning Source is available to print a book within minutes on-site for a customer, thereby reducing the number of titles a bookstore would need to inventory. Lightning Source recently published its 100 millionth POD book and now has a catalogue of nearly six million titles.
Widespread use of the EBM may be years off but just the thought of sending a digitized book to a site across the globe and then printing a single quality copy, for purchase is astounding.
Here is a short video of the EBM version 2.0 in action:
How To Edit Facebook Row Of Photos
With the new Facebook® profile comes a row of photos on the top of your profile. The photos are selected from all of the photos that you are tagged in. Privacy being what it is many people are eager to figure out how to remove an image or for those that are more ambitious, to even customize the row of photos as you’ll see below.
How To Remove A Photo From Displaying
 As you hover your mouse over the photos you will notice a small [X] in the upper right hand corner of each photo. When you click it you will be presented with a dialog asking whether you want to “hide” the photo from your profile page. Click “Hide Photo” to remove the photo.
If there are other photos that you are tagged in, the photo will then be replaced by one of those. Obviously if you are tagged in many photos this could take some time. Repeat the steps until you are happy with the resulting photos that are displayed or until all of the photos have been hidden. If all photos are hidden the entire row of photos will no longer appear. If that is your intent you will probably need to repeat the steps if you or a friend tags you in another photo.
Unhiding Photos
 Once you have hidden a photo you can choose to unhide photos. At this point I’m not certain whether you have the ability to unhide an individual photo or not, however when you click to “edit your profile” and then click the “Profile Picture” link along the left side you will now see that an “Unhide All” button has been enabled.
![]() Note however that if you click the button to unhide the photos the result is that ALL of the photos are unhidden. The button executes immediately without presenting a dialog stating what you are about to do and the button returns to a disabled state again (until you choose to unhide a photo). So be warned that if you didn’t intend to do that you’ll have to start all over again.
Note however that if you click the button to unhide the photos the result is that ALL of the photos are unhidden. The button executes immediately without presenting a dialog stating what you are about to do and the button returns to a disabled state again (until you choose to unhide a photo). So be warned that if you didn’t intend to do that you’ll have to start all over again.

If you hide all but just a few of your tagged photos the profile photos will show empty position holders until additional photos are tagged. One tip I discovered is that if you tag your current profile picture it did not automatically show up. If you want it to appear you will have to reload the same image and tag it.
Feeling Ambitious?

If you’re feeling really ambitious you might try to do some customization like my friend Gabe (@gabetaviano) did. He actually customized his row of photos to tie into his profile picture to create a photo montage. Great job Gabe, hopefully somebody won’t tag you in a new photo and distort it!
You can download the free Photoshop template Gabe used by following the link from howtonew.com.
Wrap Up
Not sure what future plans or functionality Facebook® is planning, but this should get you on your way of removing images you would prefer not show up on your profile.
You can also checkout the Facebook Help Center page for info under “Editing your profile” and “Privacy”.
If you have any other ideas or I’ve missed something leave a comment.

 Fear Not Verse Of The Day
- Matthew 06:28-30Cast your cares on God, trust in Him who is able to provide all things, for things of this world fade and wither away.
Weekly Bible In A Year Feed
- Sat, Jul 25Sat, Jul 25 Bible In A Year Readings - 2 CHRONICLES 14:1-16:14 | ROMANS 9:1-24 | PSALM 19:1-14 | PROVERBS 20:1
- Fri, Jul 24Fri, Jul 24 Bible In A Year Readings - 2 CHRONICLES 11:1-13:22 | ROMANS 8:26-39 | PSALM 18:37-50 | PROVERBS 19:27-29
- Thu, Jul 23Thu, Jul 23 Bible In A Year Readings - 2 CHRONICLES 8:11-10:19 | ROMANS 8:9-25 | PSALM 18:16-36 | PROVERBS 19:26
- Wed, Jul 22Wed, Jul 22 Bible In A Year Readings - 2 CHRONICLES 6:12-8:10 | ROMANS 7:14-8:8 | PSALM 18:1-15 | PROVERBS 19:24-25
- Tue, Jul 21Tue, Jul 21 Bible In A Year Readings - 2 CHRONICLES 4:1-6:11 | ROMANS 7:1-13 | PSALM 17:1-15 | PROVERBS 19:22-23
- Mon, Jul 20Mon, Jul 20 Bible In A Year Readings - 2 CHRONICLES 1:1-3:17 | ROMANS 6:1-23 | PSALM 16:1-11 | PROVERBS 19:20-21
- Sun, Jul 19Sun, Jul 19 Bible In A Year Readings - 1 CHRONICLES 28:1-29:30 | ROMANS 5:6-21 | PSALM 15:1-5 | PROVERBS 19:18-19